The whole thing hooked up
|
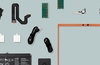
In the images below you can see how the keypad has been
connected. All the headers from the switches have been plugged into the
PCB and the PCB cable is attached to the 10pin keypad header (as seen in the
second image). The GPO controlled LED's have been connected independently
of the PCB and I have used spiral wrap to make the cables neater...
You can see how I have used heat
shrink sleeving wherever I soldered and where short circuits could
happen... Keypad mounted in the case
Yea yea, the DVD drive will get the work
over when I got some spare time,
LCDC, what on Mars is that? VIDEO OF
KEYPAD AND VFD IN ACTION [6418 KB] Thank you!! I would like to thank the following people that helped make
this 'mod' possible. Listed in no particular order.... The many peeps at BiT-Tech, HardOCP, ZapWizard, AW3K,
Cheese, and Rob Arnold for the inspiration... Chris Cotton, for his metal cutting skillz... Gary Cho of CustomPCB
for the great service in getting the PCB to me! Henry, Adam and all of
MatrixOrbital for making such fine
displays! The author of LCDC, simply the BEST display software... VFD Lovin'! I realized at the end of all this planning, that the LCD
does not look 'brilliant' when mounted in the front of my case, but due to the
beauty of my 'keypad PCB' I was able to apply it to the VK204-25-V VFD Module
(shown below),
just the same way! Of course the LCD will find a spot inside the case...
Notice the trademark display controlling
circuitry on the rear of this Noritake display! |