Introduction
For many people reading this HEXUS.help guide, opening up a desktop PC and upgrading it, or even building one from scratch, isn’t that big a deal. If you know what goes where, it’s not all that hard. However, there seems to be some form of stigma surrounding laptops when it comes to upgrading them. There need not be, though.
Building a laptop from scratch may not be all that easy, but they’re still pretty easy to upgrade… most of them, anyway. The easiest part to beef up is the RAM, just like in a desktop PC, so that’s what we’re going to guide you through today.
Can you do it?
Before even thinking about what to buy, it’s handy just to check whether you can get the RAM on your laptop easily. Some are easier to get to than others. Chances are it’s hidden by one of the access panels on the underside of the laptop. If there’s no info in the manual, then a little bit of careful exploration shouldn’t do any harm.

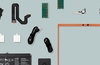
In the above image, the central panel is the one behind which the RAM (and wireless card, incidentally) are hiding.
Which RAM?
If you’ve found where the RAM goes, check how many modules are in place. It’s a tight fit in there, but there are usually two slots, one on top of the other, and chances are they’re both full. That means an upgrade requires you to remove the existing modules. If there’s just one slot taken, however, you might be able to simply add another.
With that in mind, you now need to know how what modules your laptop supports. It will accept some form of SO-DIMM module, but just like with desktop DIMMs, there are SDRAM, DDR and DDR2 variants. Usually, the easiest way is to use a configurator, such as the Corsair powered one here at SCAN: memory configurator
Using such a tool means you’ll only be presented with compatible modules in sizes that’ll work in your laptop. Now choose what you want, and make a purchase.
Installation
Now for the physical installation, which is probably easier than the choosing!

Get yourself access to the RAM slots by removing whatever panels you need to. In this example it’s just two screws and then some gentle(ish) persuasion to get the panel off.

The RAM modules are clearly visible here, one on top of the other. At either side of the modules are metallic parts that hold the RAM in place, you can see them near the notches in the RAM.

These can be moved outwards by a small screwdriver or your fingers if you’re careful. The RAM will then pop up about 30-45 degrees.

It’s then a case of lifting the RAM out, then repeating the step for the second module.
Installing a module is simply a case of putting the new one in at the angle from which the last one was taken out, making sure it’s pushed into the connector, then pushing it flat until it clicks into place. Make sure you put the bottom module in first, while you can still access it.
When finished, replace the panel and fire up the system to see if the RAM is recognized. Running a program like memtest is recommended, to ensure it’s functioning properly. If there are any problems, make sure the RAM is securely in place and fully compatible with the laptop. Failing that, replace the old RAM and seek technical support.
Done
See, it’s not all that hard, just a bit more fiddly than with a PC. Still, a bit of care and planning, as with any PC upgrade, should see the whole thing done without much hassle.