The First Boot
|
The actual hardware installation was very simple and easy to do. Probably because I wasn't installing in a case, but on my test bench. Throughout this review the hardware I used is as follows:
As you can see a very barebones system. Straight away I was surprised to discover the following screen:
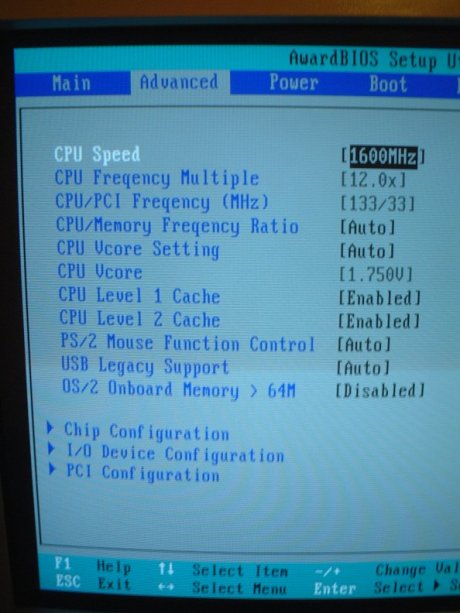
This is the first time I have seen a post screen like this that was not on a branded machine such as Compaq, HP or one from PC World. Although very pretty I personally like to see what my computer is doing. At the bottom of the picture you can just make out the options it gives. So I quickly hit DEL and entered the BIOS Setup. The BIOS Firstly I hunted down the option to turn off the POST splash screen. Then I took a look at the performance options. Namely the CPU and then the RAM settings. With my XP2000 unlocked I straight away set the multi to 10x and the FSB to 166 and then used the KT333 option of a 5/2/1 divider. Here is a picture of the CPU BIOS setup screen:
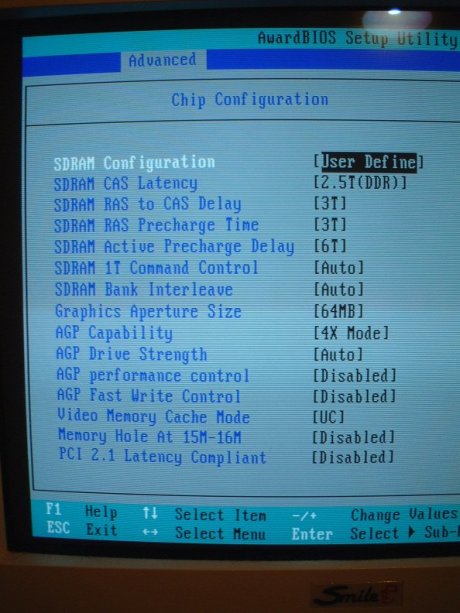
Straight away I noticed an important feature severely lacking here. A voltage adjust for the ram. My Kingmax ram has always liked a lot of voltage in the past from my "old" KR7A-Raid motherboard and I had a feeling here that this would impact on my performance. Next up in the BIOS to get the once over was the ram settings. Here is a picture to show the range of settings Asus provided for us to play with:
What isn't shown in the picture is that there are more options to scroll down to. Asus have done well in the range of memory tweaks available. Straight away I set my ram to the highest performance settings. These are:
Saving these settings I let the machine reboot. Because it was a new motherboard and I required an accurate set of benchmarks. I set about a new XP Pro installation. Booting from the CD-Rom everything appeared to be running fine. This was at least until it got to the 2nd reboot and started doing the main install. Then the system hung. Trying again I went through the process of booting from the CD but this time it hung during the hardware detection. With the next reboot I went straight into BIOS and lowered the FSB fractionally to 164 from 166. After this the WinXP installation went smoothly. Obviously its disappointing having to clock my ram a bit slower due to a function missing from the motherboard (vmem adjust). However I carried on and installed the usual range of benchmarks into my fresh XP install. |