


Fitting
I've chosen the Athlon 64 route since that's my available test rig for the Reserator and its CPU block, but the process is no more involved should you use a different socket, just the steps are slightly different. On we plod.Your first steps are to build the closed loop so that you can fill it with water and do leak testing, before mounting to your processor. That means placing the PC in its usual place in your room/office/cell and locating the Reserator somewhere within spec, according to Zalman's guidelines in the manual. Basically you want to site it on the same level as the PC it'll be cooling, not below or above and definitely not with the Reserator on its side. It needs to stand tall and proud, not too far away from the PC in question, roughly in line. This ensures the pump in the Reserator doesn't need to counter the effects of gravity when pumping water round the system, keeping things nice and easy.
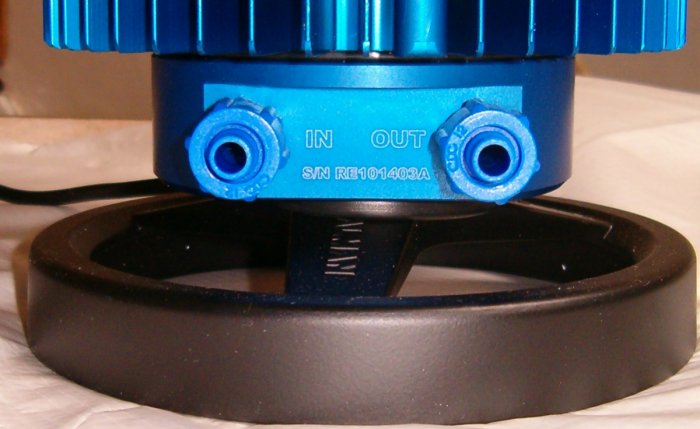
With the Reserator near the PC and the waterblock somewhere near the socket it'll be clamped to, you need to attach the universal fittings to a spare, empty PCI backplane space on your case. The universal tube fittings provide the conduit for getting the tubing into and out of your case. Zalman also provide instructions and a template for drilling holes in the side of your case for routing the tubing that way, should you wish to avoid the PCI backplane route. Then place the supplied flow-meter next to the outlet from the Reserator, so you can visibly see water flowing round the system when the pump is active.
With everything placed roughly where they will be in a final install, measure the lengths of tubing you'll need to complete a full closed loop between the waterblock(s) and the Reserator, paying special attention to the flow of the water inside the loop, as denoted by the In and Out markings on the connectors. Cut the tubing perpendicular so that it's as straight as you can humanly make it, then attach it between each of the points in the loop. The screw fittings that Zalman chose for the Reserator 1 are insanely simple to use. Slide the screw connector over the end of the tubing in the right direction, push the tubing home over the male end of the connector, screw the connector down until it can screw no more. Repeat for each part of the loop. Once done, that's your loop built.
Filling it with water is a piece of cake. I personally did it by cleaning out a two litre bottle of juice, filling the empty bottle with distilled, de-ionised water (Zalman say you can use tap water, but unless you want algae build up, something a little purer is recommended) and a little algae prevention fluid (not supplied), then pouring the entire contents into the Reserator. A tiny 100ml extra top-up after that and the lid was screwed back on. Zalman recommend filling it around 80% of the way to the top, or around 2 litres worth of coolant.
Leak testing can then commence. You turn the pump on by plugging it into the mains and flicking the in-line switch. The flow-meter will jiggle if there's active flow. If there's not, check the pump is plugged in properly and make sure the switch has been flicked.
Fitting the CPU waterblock

Fitting the ZM-WB2 Gold, in my case to an Athlon FX test system, is a piece of cake. The AMD64 mounting hardware requires you to remove any existing retention frame and bracket from the front and back of the motherboard. On 99% of AMD64 boards that's a 30 second job with a Philips screwdriver and a little force to wiggle the retention bracket free, since it's usually stuck in place with a sticky pad.
Then you line up the supplied retention plate with the two holes, put a paper washer (supplied) over the hole from the front, followed by screwing in the large bolts that'll eventually hold the block mounting screws. Once the mounting hardware is in place, screw the motherboard into your case and lay it flat. Prepare your CPU with the supplied thermal paste, pop it in the socket, line the waterblock up over the top and place the spring-loaded clip over the center of the block, in between the barbs. Two screws then attach it to the mounting hardware you just installed. Like a VapoChill or similar, you screw the screws in slowly, by hand, a quarter turn at a time, alternating between them.
Here's a couple of pictures of me doing simple leak testing.


On to the testing.


