


Installation
Installation has been made as easy as conceivably possible, given that we're dealing with watercooling components here. Once the pump is in place and the pipe work for the circuit is installed, you'll need to fill the circuit with coolant. The drawback to having a 12V pump is that you need to have the PSU on to complete the filling process. Asetek have this covered, providing a small wire with which you can short the PS_ON (green) wire on the PSU's ATX connector with a common (black) wire. If you disconnect other components from the PSU while doing this, you can run the pump without powering up (and overheating) the system.
I must highlight one issue I had with this process, however. I filled my loop while it was outside the case, so I wasn't using my high-spec Tagan 2Force PSU. Instead I was using an OEM 400watt model. This PSU would cut itself out whenever I tried to turn it on with just the pump attached. I had to connect up a hard drive as well, presumably to put some load on the 5V rail, to get it to power up successfully. If you encounter a similar problem, don't immediately presume a problem with your pump - investigate whether the PSU is cutting out because there isn't enough load on it. Of course, this isn't Asetek's fault and it is a small potential hassle to incur when dealing with 12V PSU powered pumps.
Actually filling the loop with this pump/res combo is an absolute dream. I had the pump situated at the lowest point in the cooling loop during filling, which is the best place to have it. Slowly adding water, there were no belches of fluid from the reservoir, only air. The loop was quick to fill and any air was gone within a couple of minutes. This alone puts the WaterChill Xtreme 12V pump in my good books, making my old L20/fill port combination seem appallingly cumbersome.
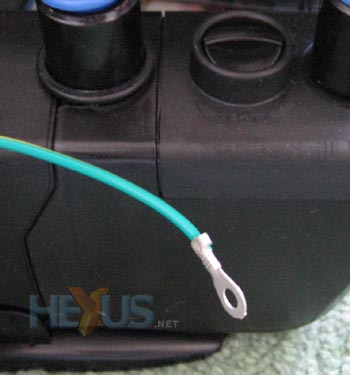
Wherever you find yourself forced to situate the pump, there shouldn't be any need to worry about electromagnetic interference. The pump itself has shielding around it, plus a grounding lead which you can attach to the case somewhere, a motherboard standoff is generally what is used. Is a grounding lead a bit gimmicky? Possibly, as I've never had trouble with pumps that don't have one. Still, it's there, so it will be used.
So, there's water in the circuit and everything is working well. However, there's still some more setting up to do. Let's glance at the back of the pump again.
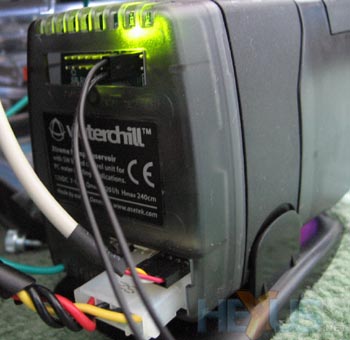
Things are looking a bit busier round the back of the pump now. Here you can see the power connector is attached and that the pump is running (signified by the green LED.) There is also a cable connecting the pump controller to a spare set of motherboard USB headers. I say spare, when in fact I didn't have any spare, and had to lose the functionality of a front USB port to accommodate the pump interface. Furthermore, the cable can easily be installed incorrectly, although reading the manual soon makes it clear how to attach the cable to the pump. I'd prefer to see some sort of keyed connector for the pump at least, and possibly even a USB type A connector for the other end, allowing the pump to be connected up to one of the back USB ports, rather than sacrificing a front USB port.
Next to the USB connection on the controller is room for two 3 pin fans, up to 24W each. Further up is the connection for the optional LCD and next to that the headers for the two temperature probes and the LED that you might choose to mount in your reservoir. I can confidently say this pump has more connections on the back than anything seen before. While impressive, it does mean cabling can get messy, so take your time when installing this pump to route cables neatly.
Got the power, fans, temperature probes and USB interface all setup? Time to install some software!


