|
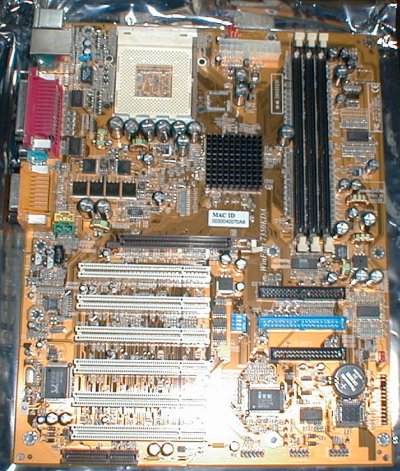
Let's start at the top left and work our way across and down as usual. The socket is the very firsst board feature that you come across. Positioned a little bit further left than you'll see on the majority of Socket A board, it's up-down oriented and it passed the Swiftech MCX462 test easily with plenty of room to spare. The bottom of the socket is flanked by a row of capacitors with a further pair well out of the way on the right, flanked on top by the ATX power connector. It's a pretty ideal placement for many tower cases where the cable can just be dropped onto the top of the board and not obscure the socket area.
3 DDR DIMM slots lie to the right edge of the board surrounded by power circuitry offering up to 1.5GB of main memory and I was able to populate the board with 3 sticks without issue (from different memory manufacturers no less).
Being a single chip solution the space usually taken up by the southbridge in the lower right hand area of the board is instead taken up by horizontally oriented IDE and floppy connectors. The single chip SiS735 sits rather high up on the board and you'll find a sticker (if you get the board with integrated Ethernet, there's one without) with the MAC address of the ethernet controller on the board.
The rest of the board is pretty standard in layout terms. The board features AGP and 6 PCI plus a CNR which, for the first time I have to say, I don't find particularly useless. The target audience for the board means that CNR peripherals, while not ideal, are actually useful. A cheap £5 CNR modem would be a nice addition to this board for the total all in one solution to cover all bases. You just need to add graphics then and you have a full compliment of all the features needed for a decent workhorse.
There's a DIP switch bank for hard selecting your multiplier on the CPU but it's also software controlled in the BIOS so there's no real need to touch it.
The ATX case header is clearly labelled and I didn't need to refer to the manual at any time to get the board up and running and hooked up to my case. Finally the IT8705F super I/O chip sits just below the floppy connector and it's worth mentioning since it runs the legacy I/O hardware that the SiS735 doesn't take care of.
All in all, a slightly unusual layout since it's a single chip motherboard but component placement is fine and sensible.
Onto the bundle, BIOS and manual.
|


