


Installation
Installation of the WaterChill has given me more problems than any other piece of hardware recently, with none of it Asetek's fault. Put simply, I've not been able to find a motherboard that would accept both CPU and chipset waterblocks. The initial plan was to put the kit on ASUS' K8V Deluxe motherboard and do the testing on Socket 754, something I don't think any other site has done yet. Scrap that, neither K8V I have will let me remove the CPU heatsink retention bracket.Socket A it will have to be, I'm not torturing my EPoX P4 board, so enlisting the help of the latest DFI LanParty NFII Ultra 'B' was next. While I could get the northbridge heatsink off OK, there's a tiny surface mount resistor right next to one of the holes needed to mount the CPU waterblock. Final board to try now, an ASUS A7N8X 2.0. No problems with heatsink mounting holes this time, so CPU waterblock won't be a problem, but the chipset heatsink wont budge. It feels completely epoxied on, running the board to generate some heat in the bridge to loosen the heatsink compound is a no go too. To get this article out of the door, A7N8X 2.0 it'll have to be, sans testing of the chipset block. Look out for a more complete article on Socket 754, using all blocks, in the future.
So while it's not Asetek's fault that none of my test motherboards were able to accept the kit completely, it's definitely worth checking compatibility with your hardware before purchasing a full KT12 kit. They have an excellent set of support forums for doing just that, be sure and have a browse before you buy.
However, given a compatible motherboard, installation is easy. Push-fit connectors mean installation of tubing is simple, once you get it aligned correctly. I mentioned the inflexible tubing on the previous page and depending on your case layout, it'll either be easy to manipulate or a total pain in the ass. Personally, I'd have much preferred soft tubing using slip-on pipe covers that [H]ardOCP mention, to make it suitable for use with the WaterChill's push-fit connectors. During installation, more than once I thought the tension created by the inflexible tubing would shear the GPU waterblock free of the card; it was bending the card pretty badly.
For Socket A, installing the CPU waterblock first, you install 4 push through steel bars, one for each of the socket holes.
The steel bars get screwed to the motherboard with a screw and nylon washer combination. Finger tight with the screw held still is the recommendation, no need to overtighten. It's a mechanism I wouldn't mind seeing used with other large heatsinks if possible, it really works well. With the four bars in place and your CPU prepared with a little thermal compound, you can slide the CPU waterblock over the four bars, through the holes on the acrylic lid. Depending on your motherboard and space around the socket, you might have to use an alternate acrylic lid for the CPU block. On the test motherboard it would have been preferable to swap from the universal 10-hole lid to the specific Socket A version, but I got away with it. A slight prod on the offending capacitor to bend it out of the way was all that was needed.
Using four hand grip screws, you simply screw them into the top of the steel mounting bars until the screws bottom out and you feel the tension. A little twist further to make sure and you're done, very very simple and, for me at least, easier than a clip based heatsink to install. Here's the end result.
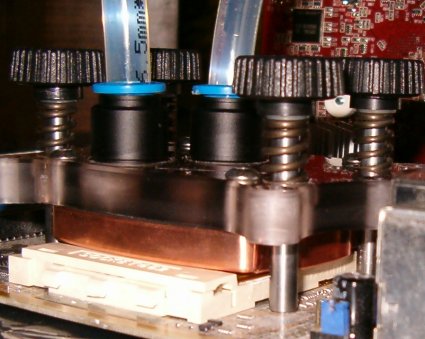
GPU block installation
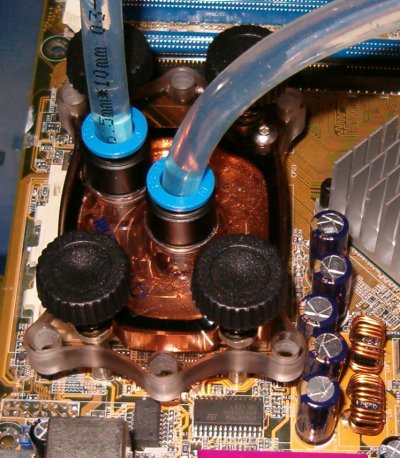
GPU block installation is no harder. Remove the existing heatsink from the card by whatever means necessary, apply a little thermal compound to the top of the GPU, line up the block correctly and hold it on top, pushing the two supplied screws through from the front of the card to the back, via the block. Then turning the card over lets you screw down a white nylon hand screw and washer combination on each of the two screws, to fasten it to the card. Be careful doing that, it's too easy to overtighten. I had the test card bent in a clearly visible arc before I realised. There's little to no resistance when you get to the correct point, so keep a close eye on what you are doing. Note the direction the connectors are facing too, the block will go on two ways. Pointing the tube connectors at the motherboard doesn't make for good tube routing and good water flow.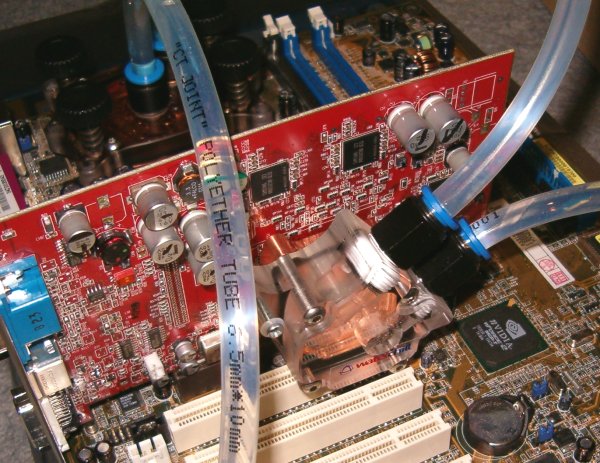
Filling the system
With tubing in place and everything connected up (follow the 'wiring' diagram in the back of the manual) in series, you can fill the system up with water. Prep your water first with the algae prevention solution, to stop your system growing little furry buggers inside your pipes. The Hydor L20 isn't self priming, meaning that it'll pump without there being water pressure present. A self proming pump will only pump when there's something to pump, aiding the filling process. As it stands with the WaterChill reservoir feeding the Hydor, it's hard to get water flowing around the system, with the initial fill process introducing plenty of air to the system. The design of the blocks is such that filling with the motherboard on a testbed like mine takes a long time. Getting rid of the air bubbles, by tilting the radiator to move air from its 2-pass design, is extremely difficult due to the inflexible nature of the tubing. It took me over 2 hours to get the system full, expelling enough air from the system to make me confident of running it properly, with power to the CPU.Soft tubing makes life much easier here, and with mounting/placing/installing the system in general. I can't help feeling the effort to produce a WaterChill with it by default would have created a much nicer product for end users, especially water cooling novices, to install.
You'll want to make good use of the handy piece of wire to trip your PSU, with nothing else connected of course, to power the pump controller. A PSU with integral on/off switch is entirely handy here.
Just like with VapoChill, the user manual is key to getting the system setup and running. Well written, easy to read and easy to follow definitely made things a lot simpler for this cack handed reviewer. Like VapoChill too, it helps to have someone else handy to help you, especially with the GPU block fitment and filling the system with coolant. Cheers Dad.
Overall
Overall, assembling, fitting and filling a WaterChill is child's play, if you take your time. The tubing (I'm moaning again, sorry) is the real sticking point. The way it arrives does it no favours, naturally bent means you have to make allowances for its shape throughout, a real problem. Especially running a line from CPU to chipset block, that will be especially painful, given their close proximity on most motherboards.So what's performance like?


