


Getting going – Setup
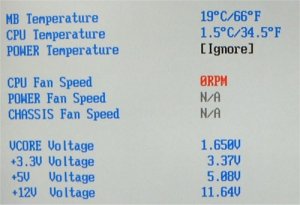
Installing and setting up the motherboard was an easy job. The components are well spaced out around the board making them easy to fit. The CPU and Ram were recognised by the bios correctly on first boot.Entering the bios we find the standard array of functions available plus access to hardware monitoring and the Asus Q-Fan controls which enable the CPU fan speed to be controlled as the temperature changes.
The bios provides you with the ability to adjust the RAM timings with control of CAS latency, RAS to CAS delay RAS precharge delay and Active precharge delay. We were able to set the XMS3500 memory to the most aggressive settings throughout the review. Using cheaper Crucial DDR2100 sticks forced us to reduce the CAS latency to 2.5 while retaining all the other aggressive settings even when overclocked up to 180Mhz FSB.

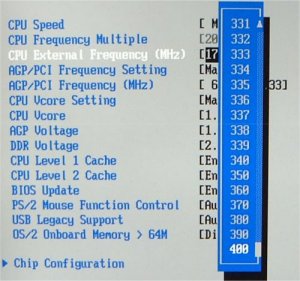
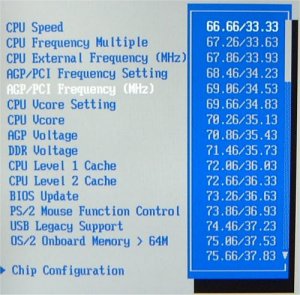
The FSB is adjustable in 1Mhz increments going right up to 400Mhz – I can not believe the board can actually cope with a FSB of anything like 400Mhz as at even 180Mhz the Northbridge gets very hot, but it is nice to know that you can be stupid if you want to.
Voltage adjustment is also very good with vcore adjustable right up to 1.95 volts in 0.25v increments. I should point out here that the vcore voltage reported in the Windows hardware monitor was significantly higher than that selected in the Bios, for example a 1.80v bios selection reported 1.9v in the hardware monitor. With that sort of overvolting the motherboard would appear to be capable of pushing 2.05v through your Pentium 4 processor, not something that should be undertaken lightly even with freon cooling. Voltage is also adjustable for RAM, AGP and USB. DDR is adjustable between 2.5v and 2.7 which could be better as most DDR sticks will cope with slightly higher than 2.7v. AGP can be adjusted between 1.5v and 1.7v.


AGP and PCI can be locked independently of the front side bus. This is vital as many components like the Radeon 9700 do not like changes to the AGP bus speed.
The board is lacking in IDE raid but as we are lucky enough to have one of the first SATA drives available we added that to the SATA raid controller. The drive was detected by the raid bios and setup ready for installing windows. The SATA raid drivers were only supplied on the driver CD so we had to copy them to a floppy disk before installing windows as XP will only read additional raid drivers from a floppy disk during the install process. It is a shame Asus did not provide these drivers on floppy disk as standard.
When booting the Speech controller keeps you up-to-date with progress with a distinctly oriental sounding voice. After a while I found this very irritating and was delighted to find that it could be both disabled in the Bios or that custom messages could be recorded using the supplied software. I wonder what messages people will experience when buying a second hand Asus motherboard where the previous owner has customised it… the mind boggles.
Windows XP installed quickly and without fault. The Asus driver CD automatically runs and offers a menu of installation options. To ensure the board is configured for performance it is essential that the Intel chip set drivers and the Intel application accelerator are installed. The other drivers are for the onboard audio, Network, USB and Raid. Unfortunately the drivers for Network, USB and Raid must be installed manually from the device manager which could be confusing for someone new to Windows XP. The CD also contains some utilities including the Asus Probe hardware monitoring program, Asus update, Serial ATA Raid manager and the Winbond speech post reporter. These all installed properly although most requested a re-boot. Finally we installed the latest ATI Radeon drivers and the machine was re-started.
We discovered a couple of annoying quirks with the system when running the Radeon 9700 pro. Firstly the previously recognised fault with the Granite Bay chipset meant that the system would re-boot it’s self after about 10 minutes, this has been found with all the Granite Bay boards we have tried and is resolved by turning off ‘SmartGear’ in the advanced display adapter menu. Secondly and unique to the P4G we experienced a cold boot graphics problem that we were unable to resolve. When using the DVI monitor connector and booting the P4G from cold the display did not activate until the windows drivers had started. This means that you can not see the dos boot screens nor the bios. Once Windows has started the display comes to life and performs as normal. The problem only occurred with the DVI connector and was fine using VGA, when the motherboard was re-booted the normal service was restored and the boot up screens displayed normally.


