Cat5 Crossover Mod
Right then all you frag artists out there… A lot of you peeps buy 2 network cards and a cable to connect 2 PC’s together. In the good ol days there was coaxial or (thin wire as we techies call it) but the most common form in use today is twisted pair cable known as Cat5 cable. Yep what’s cat5e you ask well this is type of cable is the same basically but uses all four pairs to send and receive data and used in gigabit networks.
How do I create an Ethernet network? Well see that in part 2. What protocols to use and how to set up ICS (internet connection sharing) and so on.
Network cards have a socket, which looks, like a BT plug socket but in fact this is known as a RJ-45 connection. And the Ethernet cable you use must be terminated at each end with RJ-45 plugs.
Ok so you’ve gone out and brought a 5m cable and two cards but then someone tells you that you need a crossover cable? What’s that? Well a crossover cable has a different termination on one end of the plug which means the wires are in a different sequence I wont go in to too much detail but basically in a crossover cable data is sent and received on different pairs or strands on the cable…imagine to people on a walkie talkie talking at the same time they would miss each other right then crossover cables are usually used in the industry to connect to active machines together…for example two network switches or two hubs. What if later on you want to build a small network of more than two machines and you got this small crossover lead that will go to waste. I will show you how to make a crossover adapter, which you can put on the end of a straight through cable and change it into a Crossover cable.
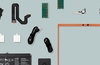
Here are the tools that are needed for the job.

From left to right.
1. Cyclops wire cutter or any old wire cutters. Don’t attempt to use your teeth.
2. Heavy duty RJ45 Crimp/termination tool with ratchet release
3. Angled wire cutters
4. ITT LAN Connect Category 5 socket termination tool
5. RJ 45Plugs
6. RJ 45Sockets
7. Twisted pair (I used UTP unshielded twisted pair cat 5)
8. Some strain relief boots (not necessary)
Step 1

Take of about an inch of the tubing I used the Cyclops, which basically has a resistance and a blade, which you turn around the cable and it cuts wickedly. You can use a wire cutter but you have to be very careful not to damage the strands of wire beneath.

You should have something like this now. You can see all the twisted pairs of cable.
Step 3.

Next you should separate all the strands of cable. HINT if you crab a separated strand and then pull it from the sheath to the end it will straighten out. Then arrange all the strands in the correct order see chart for more info.
Step 4.

Cut all the excess of the strands you need about an inch or so. HINT I have cut the cable at an angle so they can be inserted into the ITT termination tool.
Step 5.

Push all the strands through the tool this will separate them to the right specifications and then squeeze the handles so the last remaining excess can be cut off and it will leave you with the exact length ready for termination in the socket.

Like so!
Step 6.


Here is a picture of me inserting the strands into the socket! HINT if you put the ends in at an angle it will be easier to handle.
Close the lid on the socket and carefully place it in the other end of the same tool and SQUEEZE!

You have terminated one end successfully!
50% complete
Step 7

Put the strain relief boot on this way and remove about an inch of the sheath so you get something like this again.

Separate all the strands and put them in order (see chart)
Step 8

And cut off the ends. You need to leave about 1.2-1.4 cm of strand NB. I have done this one handed but you really should be holding on to the strands nearer to the sheath so that when you cut the ends of the stay in the same order!

Like this!
Step 9

Push the strands carefully into the RJ45 plug and double check that the ends go in all the way and that the sheath has gone past the cable grip within the plug if in doubt make sure its exactly like mine shown above.
Step 10.
Crimp the plug with the tool as shown and slide the boot over the plug! That’s it your done!

You should really test the cable with a tool such as the one shown here: it’s called a mod tap! You will have seen it in the pictures above.

TA DA! The finished product!

And here it is connected to a straight thru cable to make it into a crossover cable!

Koolvin.
I would seriously recommend in using RS component tools as I can speak from experience I have seen many tools and most of them are Mickey Mouse tools. So it’s a very handy tool, which is a joy if you use a laptop or go to LAN’s and instead of carrying around two cables, you just have one! Imagine carrying 2 20m cables! With this widget you have true versatility!
You can use the chart below and the methods above to create cables which are terminated at both ends with plugs and also if you are a nutter like me and want to network your whole house and put sockets on the walls in every room.
Conclusion 10/10.
Chart
of connections cable pinouts for straight through and crossover cables.
Straight-Through Cable
Crossover Cable