Project Black Ice
Introduction
Welcome to project Black-Ice. This is the first part in a series
of articles documenting the construction of probably one of the fastest, coolest
and most outrageous PC's to ever be built. Just about everything imaginable
is being modded and you lucky people are going to get to see just what a mad
overclocker with a scary craving for more speed, can really do.
You've probably seen super cooled PC's before, where the processor has been taken to new limits with water cooling, Peltier elements etc. You've probably seen articles where graphics cards have had all sorts of heat-sinks and fans attached to them - project Black Ice aims to take all this to a new level, and really give meaning to 'super cooled'.
Why 'Black Ice'? - well the case is black and I think you can guess the rest :)
Enough teasing, lets just see what makes this special. The cooling system consists of two main units : the CPU cooling and the graphics card cooling.
Modified Vapochill™ refrigeration
system
-Estimated CPU speed - Athlon XP
2500+, 2000 MHz or greater
-Estimated CPU Temperatures of -10 C under load
-High efficiency vapor phase change system, results in little extra heat
-Quiet running
-Can handle up to 120 Watt heat load, with little temperature change
-Modified for automatic compressor speed control, depending on CPU load
-Safety shutdown system cuts off mains instantly
-Redesigned airtight evaporator housing, for safe mounting with AMD CPU's
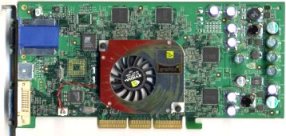
Water and Peltier cooled Geforce 4 Ti4600
- 156 Watt Peltier with dedicated external 15
volt power supply
- 1000 LPH pumping system, modified danger den maze 2-2 water block
- High efficiency parallel fin heater core radiator (Big Momma)
- Estimated GPU and RAM temperatures of -10 C
- Entire card clamped together with neoprene thermal insulation
- PWM Peltier power controller - reduces heat and saves energy
Possibilities:
- Serial interface to software program
- Dynamic alteration of GPU and ram speeds, when gaming or not
Modified Chieftec Dragon DA-01BD Full Tower Case
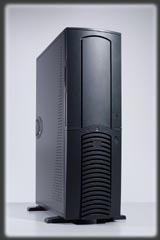
- Stylish black finish
- Bay cover door
- 6 5 1/4" bays
- Rear 120mm Blow Hole, for Vapochill exhaust
- Front 120mm Blow Hole on case door for Vapochill intake
- Top 120mm Blow Hole
- 2 rear 80mm exhaust fans
- 172mm lower front radiator intake fan
- Large side view plexiglass window
- LCD Monitoring system embedded into Bay Door
- 3 button menu system to select functions, embedded into door
- Manual fan speed control knobs embedded into door
Other crazy modifications include: voltage mods to the motherboard and possibly the graphics card. The motherboard will also have a few other tweaks to improve power stability at high core voltages.
All this fancy cooling does come with a slight chance of a nuclear meltdown - so the whole lot is monitored and controlled by a bank of electronics, with a very stylish looking backlit LCD display mounted on the front door of the case. The electronics unit will have a multi-channel PWM fan speed controller, various temperature monitoring probes, safety shutdown systems, Peltier PWM power controller and Vapochill™ compressor controller.
So that's all the special stuff going into the Black Ice PC, here's what makes
up the rest of the system components :
-Athlon XP 1700+ / 1800+ / what ever I can get
my hands on.
-Enermax 460w PSU
-512mb Crucial DDR PC2100 memory, CAS 2 Turbo
-Abit KR7-133 DDR Motherboard
-IBM Deskstar 60GXP 60 GB Hard Drive
-Geforce 4 Ti 4600
-Creative SB Audigy Player sound card
-Pioneer 16x DVD Drive
-Yamaha 16x10x40 SCSI rewriter
Vapochill System
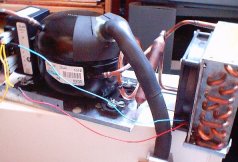
For those of you who don't know what a Vapochill cooling system is, I'll run through a basic outline of how it works.

The Vapochill is a phase change cooling system which basically uses all the same parts and principles as a household refrigerator. It comes pre-assembled and is part of a 'bare bones' system that you can buy from Asetek Inc. The cooling part of the system comprises of a compressor, condenser, capillary tube and an evaporator. The system works on the principles of evaporation: when a fluid evaporates, it takes the heat with it - the human body uses this effect to cool down by sweating. By using a refrigerant such as R134a, you can get evaporation to occur at much lower temperatures, as R134a is a gas at room temperature. The evaporator element of the Vapochill system is the part that gets very cold, this is attached to the processor by a special mounting mechanism. On reaching the evaporator the liquid refrigerant drops in pressure and begins to evaporate, absorbing heat. The refrigerant gas is sucked from the evaporator into the compressor, here it is compressed back into partial liquid form. The liquid refrigerant then passes through the condenser which consists of a radiator and fan - this removes the heat from the refrigerant which now becomes completely liquid. It then goes on through a capillary tube - this is needed to lower the pressure of the refrigerant so that it can evaporate more easily as it passes back to the evaporator.
This form of cooling is fairly efficient - far more efficient than Peltier devices which produce a huge amount of excess heat. The only extra heat produced is that of the compressor motor and of the heat added during compression. This project only actually needs the cooling rig from the Vapochill system, so it was carefully removed from the Vapochill case and the chill-control(tm) system detached. The cooling rig is intended to be mounted into the lower 3-4 bays of the chieftec case, with blow holes cut on the front and back for a steady air flow over the cooling rig and through the condenser.
Now onto the fun part - the experiments!
Once I removed the Vapochill unit from the casing, the first thing to do was to test just how cold it can get. With the chill-control unit detached I manually wired up the 12V input and the fan to my Enermax PSU and powered it up. Within a minute or so the evaporator started to get VERY cold, so cold that I couldn't hold it any more in fear that my hand would soon become frozen solid. I took apart the clamshell housing to get a good look at the evaporator element :
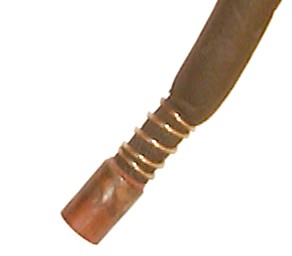
To make sure the system was OK, I let it run for a few hours with the evaporator half submerged in a bowl of water...maybe this will give you an idea of just how cold this thing gets :
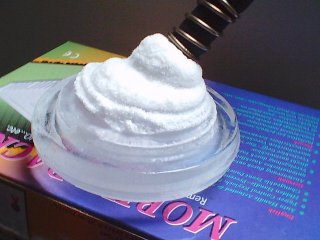
Hmm, where did I put the flakes
As you can see the Vapochill rig is performing perfectly, so I reassembled the
Vapochill clamshell and attempted to mount it on my Athlon XP chip for testing.
This is where I ran into some trouble with the mounting mechanism. After a few
attempts to get the evaporator to sit nicely on the core, I thought it would
be wise to stop having chiped all four corners of the core and sheared off a
thin slice down one side - eek!. I was worried that my processor had been crushed
to death, but a quick test with a normal heatsink showed it was still working
- phew!.
The Vapochill cooling system is great, but the mounting mechanism is somewhat lethal when it comes to the very fragile cores found on AMD processors. This problem does not occur on Intel Pentium IV CPU's as they have a protective 'heat spreader' plate fitted over the core that protects it from being crushed. Looking around the Internet forum's and newsgroups confirms that the Vapochill socket A mounting system can be very hard to mount without causing some damage to the core.
Well I had feared this before I got the Vapochill system, so came up with a back up plan - I designed a new mounting mechanism!. The primary problem with the mounting mech on the Vapochill is that the evaporator cylinder moves too much when tightening up the bolts. The large unforgiving copper evaporator rocks on the fragile core, taking chunks out of it as it goes. My solution was to design a new housing for the evaporator that ensures it doesn't budge an inch when being fixed in place. My second concern with the Vapochill mount is the fact it uses the socket lugs to hold itself in place - which I have never trusted when holding large heavy items such as this. Therefore the new mounting mech will use the four bolts that go through the holes surrounding the socket. A diagram of the new mech can be seen below:
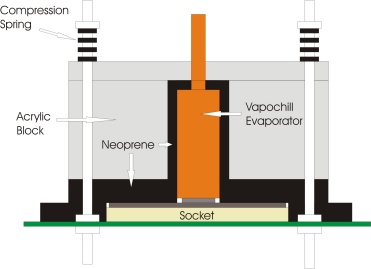
Cross-sectional side view of the new Vapochill evaporator housing.
The entire evaporator is to be encased
in an acrylic block made from two parts - a base block with a cylinder cut out
and a top part with a small hole cut out for the evaporator pipe. The block
will have four holes drilled through it and will be mounted by long nylon bolts
through the motherboard. The area around the socket will have a neoprene gasket,
which will mate with the neoprene on the bottom of the acrylic block - ensuring
an air tight seal, preventing condensation and frost.
Now the rest of this article was going to include the construction of the this new housing, but an unexpected delay in the shipping of key metal and plastic materials has meant that will be delayed until a future article.
So that concludes the first installment of project Black Ice. In the next article I'll document the numerous modifications to the case and possibly the new mounting mechanism (providing a certain company actually gets round to shipping my parts :D )