IWill DVD266-R & Chenbro 9891
Go dually with the Iwill DVD266-R & Chenbro 9891 four-wheel-drive Cube
The Background
I still feel the sad loss at the passing of my BP6. Will there ever be another
truly great board? And why did I not replace it straight away - with another
BP6??
Never mind the fancy benchmarks. In the real world you just cannot beat a
dual-processor machine for the smooth application of power. It's the difference
between a lumpy straight-four and the refinement of a V8.
After the demise of my BP6, I built a system around the Asus CUSL2 and the
highly overclockable PIII700 - both acquired from Overclockers.co.uk. An
amazingly stable board that never once asked to be fed extra volts. Something a
little special in the world of single-cpu motherboards. But it was still not a
dually.
I also wanted something a little different. The Asus CUR-DLS was considered -
and considered too expensive. I also planned for a QUIET machine (what's that?)
in a quality case that would out-last the individual components within.
The Components
- 2x PIII 1GHz
- 2x Quantum Fireball Plus AS 20.5 GB
- Iwill DVD266-R
- 2x 128MB PC2100 DDR
- Geforce2 MX*
- Mirai Burner
- D-Link 10/100 NIC
- Lucent chipset internal V.90 modem *
- 52x CD-ROM *
- internal ZIP100 *
- Floppy Drive
- 3x rounded IDE cables
- 1x rounded floppy cable
- One paper clip and a rubber band
* = not new - taken from another
machine.
and something to put it all in. I seriously considered several cases. I emailed
a German supplier for a Noise blocker case with full sound proofing. No response
to my email. This firm has a huge range of goodies which all overclockers would
give their right wotsit for. Yet they do not answer emails, will not take
telephone calls and will not fill orders.
So I found and fell in love with another case. But I had some trouble finding it
in the UK. I don't mind ordering kit from the US or Europe but I do object to
paying international freight on a case. I had always been interested in 'cube'
cases. The YY black cube seemed good value but, on closer inspection, I was not
sure that it allowed for sufficient space on the mobo side. Space is needed both
for efficient airflow and for the Silverado's. Ah! The Silverado's - more on
this later.
I did eventually discover the UK distributor for the case and it turned out to
be ever so easy to order from them. It arrived the next day - sex on wheels -
the
The Chenbro 9891
What a case! I didn't expect a PSU or case fans but this came with both. The PSU
was a waste of time being something of a seven stone weakling. Apart from being
rated at just 250 watts, the power cables were only of 'standard' length which
meant that it could not be used to power this motherboard installed in this
particular case. So out it came and an Enermax 451 was summoned post haste. The
250 watt PSU was put to good use only two days later when it was used to replace
a failed PSU in a firewall and fax server.
It's a monster - but don't be fooled by this unfair comparison to the tiny Terminator
This case can take two 92mm fans
at the front. It can also take either a 120mm OR a 92mm fan at the rear. If a
120mm is fitted then it is not possible to use the supplied 3½" drive cage. This
beauty came supplied with a single 92mm font and rear. The rear 92mm fan is
positioned to draw air through the internal 3½" drive cage.
So much for the extras. What about the case itself. To the front we find a
three-position key. This allows you to secure the whole unit, to allow access,
via a small door, to the external 3½" devices or to open the full-height door on
the right. This louvred door covers the external 5 1/4" devices. Behind this
door is a small switch which allows you to open the entire front of the case.
Once open, you can then remove the front completely. This gives access to the
washable
filter protecting the two 92mm front fans.
The rear of the Chenbro. A 120mm fan can be fitted upper-left but a 92mm fan is more practical as the drive bay can then be retained.
Most components on this case are
removed in precisely the same way - remove two screws and slide. These
instructions apply to each of the side panels, to both drive cages and even the
motherboard tray.
The only part of the case that appears fragile is the plastic rear panel. It is
much stronger than it appears, however, although it frightens me whenever I have
to remove it and it must be removed in order to remove the side panels.
The metal side pieces are removed by unscrewing two screws at the rear and
sliding the section to the rear - there is even a handle provided for this
purpose. The sides are such a good fit - with such a positive feel when sliding
them into place - that I haven't bothered replacing the two screws. The rear of
the case, when locked in position, prevents the removal of the case sides.
Two 92mm fans at the front - only one is supplied with the case.
Motherboard Tray. This is a
removable tray rather than a slide-out tray. Again, undo two screws and slide -
lift out and affix the motherboard of your choice. The case comes with a very
impressive bag-o-bits. Select the required number and type of mounting posts
from the bag-o-bits according to the supplied idiot's guide, clip them in and
attach the mobo. Easy. Then fix the mobo tray back into the case.
Connecting the power switch wires was interesting. ...... I initially thought
that it would be necessary to remove the top of the case in order to fit the
power switch wire. This was a grave mistake. The top of the case is removable
according to the specs. I guess that I require additional tools in order to
remove the top of my case - tools such as semtex. After much aggravation I
realised that I could gain sufficient access to the problematic switch by
removing the 3½" external drive bay. Now this was easy - like most other things
- remove two screws and slide. It was downhill all the way after this.
The Rounded Ultra ATA 100/66 IDE cables are of the .9m variety. If anything,
they are too long for this case. The Rounded Floppy Cable is .6m long and is
only just long enough - see pics. This is where the rubber band and paper clip
came in useful - in keeping the floppy cable in place - see pics.
Rounded cables are something of overkill in this case. Note route taken by the floppy cable and use of rubber band.
Mirai CRD-BP1300 Burnproof CD-RW.
Oh joy. What else is there to say. I have a Yamaha steam-driven burner in
another machine which I fully intended installing in this project but I got a
little carried away when I saw 'burnproof'.
Two Intel Pentium III 1GHz (FC-PGA). These are SL4C8's. Being 133fsb I never
expected them to be as overclockable as my 700's (100fsb) SL45Y . How right I
was :(
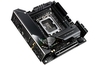
Iwill DVD266-R
The case came supplied with some extra goodies - and so did the motherboard. A
pair of heatsinks. Yes, included in the price were a pair of heatsinks. Nothing
suitable for the serious overclocker but more useful than that weedy PSU that
came with the case. These HSFs are Taisol units with Delta AFB0612HA clip-on
fans. We are not going to heavily overclock with these but they are rated for
1GHz chips - and they are very, very, quiet.
I was hopeful that an acquaintance in Denmark could acquire a couple of
Silverado's for this project.. For reasons I won't dwell on here, the
Silverado's did not show. A suitable alternative was not immediately available
but I still had the Taisol's that came with the motherboard. I later acquired a
pair of my favourite heat sinks - the Kanie Hedgehog. As a consequence, some
photos show the Taisols - some the Hogs.
One reviewer of this board observed that the positioning of the CPU sockets
caused inefficient cooling due to crossing air-flows and that the motherboard
may need additional coolers in the case to ensure stable running. This is, of
course, completed negated by using the CPU HSF's as suckers rather than blowers.
Kanie even recommend that fans fitted to their Hedgehogs are set as suckers.
Another problem solved.
Although there appears to be a
profusion of capacitors around the socket area, there
was still plenty of room for the Hedgehog and my stubby fingers during fitting.
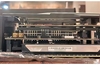
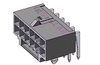
In many of the previews for this board a great deal of fuss was made of the apparently poor positioning of the floppy drive connector and the main motherboard power connector - see picture below. So what of the real world situation. Well, the floppy connector is in an unusual position and care must be taken if you have a large tower case - with the floppy drive positioned fairly high in your case then you will have to consider obtaining a longer-than-standard cable. That is, of course, if you bother installing a floppy at all. The DVD266-R is considered by many to be a bottom of the range server board and, as such, may not warrant a floppy. I almost didn't bother fitting one. It was only that when ordering other components I was overcome with a bad case of Retail Therapy Syndrome and I got little carried away.
There's quite a bit to see here
but note the routing of the power cable. Neat, tidy and out of the way.
With this case, the power connector is in the ideal place.
Starting up the system for the first time couldn't be easier. Enter the bios and set the CD-ROM as the boot device. Enter the RAID setup with CTRL-M. Set the two hard disks that have already been identified as STRIPE and off you go. Straight into the Win2k installation. Inform Win2k of a RAID driver by pressing F6. Create and format the first partition, use the supplied RAID driver floppy when requested and complete the install. It really was as easy as that. The simplest OS install for me - ever.
The AMI chip is the RAID controller
You can get a very comprehensive, two-page, data-sheet in .pdf format at http://www.iwill.net/pic/DVD266-R.pdf so I won't give a full list of features here. But here are the more attractive:
-
Supports Dual PIII or Single Celeron
-
Supports PC2100 DDR SDRAM
-
Supports up to EIGHT ATA/100 drives including up to four via the integrated AMI RAID controller
-
On-Board-Audio via a C-Media 8738 sound chip.
-
Micro-Stepping. Supports fsb of up to 200MHz in 1MHz steps.
The on-board sound chip warrents a
mention. No, this is nothing like that awful on-board sound that you may have
come across in the past. This HRTF 3D system supports DirectSound 3D, A3D and
EAX as well as 4.1 speaker systems. Is it as good as a decent (expensive) PCI
sound card? Maybe not but you probably won't notice the difference unless you
are a formally trained musician.
One of my favourite features on the BP6 was the provision of four IDE channels
allowing for up to eight IDE devices to be installed. The DVD266-R also has four
channels with two of them managed by the integrated RAID controller - the AMI
MG80649.
My processor options? Buy a couple of SL45Y's - highly overclockable PIII700's
or a couple of 1GB chips which are not well known for their overclockability.
Max 4GB in four 184-pin DIMM slots supporting PC2100/1600 SDRAM
The final version of this board is v1.3. Earlier, pre-release, versions sported
an ACR slot which has now been removed. There are no other, obvious, variations
between pre-release and final.
The VIA Apollo Pro266 chipset allows for the DDR SDRAM to be set independently
of CPU FSB. Just because you may wish to use a 100 FSB processor does not mean
that you cannot install PC2100 DDR SDRAM. Conversely, if you have a 133 FSB CPU
then you can use either PC2100 DDR SDRAM or the 100 FSB PC1600 DDR SDRAM.
I believe that this chipset allows for the inclusion of on-board 10/100 LAN.
What a pity that Iwill declined to include it.
Benchmarks
You would expect some handy Sandra's for this beast, wouldn't you. Well, you
won't be disappointed in respect of the CPU and MM bench's. The memory benchmark
was somewhat disappointing though. I can't help feeling that this board is
crying out for a major BIOS update.
Plenty of Sandra's here. Firstly, three at the stock 1GHz. One odd thing I have
noticed about these compared to other reviews of this board - The CPU and MM
benchmarks appear to be on the low side compared to others yet the (dissapointing)
MEM benchmark appears to be better than in the other reviews. Most odd.
@1000
@1000
@1000
Not the best overclocking chip -
but let's have a look at the effect of a moderate overclock
@1050
@1050
@1050
And let's not forget the RAID. Very dissapointing. I haven't had the time to
work out what the problem is here. I can achive this sort of figure with
software RAID in another computer. Although the benchmark is dissapointing I
find that I have no complaints when using the machine.
@1050
And up to 1.08 GHz
@1080
@1080
@1080
Note how the RAID benchmark is LOWER at the higher FSB. I won't pretend to
understand this apparent anomaly. I've no doubt that there is a good reason for
it and I invite technically superior beings to work out what is going on here.
And to the twist in the story. You may not be interested in Seti@Home but it may
just be able to tell us something about this motherboard that Sandra can not. I
have been running Seti@Home for much of the time that it has taken me to write
this review and I now notice something very strange about work-unit completion
times. CPU0 averages one WU every 7 hours 55mins whilst CPU1 takes just 5 hours
58 mins. We are talking of one CPU taking almost 33% longer than the other. That
is a huge difference between the CPUs. These are identical processors so the
reason must lay in the chipset. Is there a problem with the chipset and CPU0? Is
CPU1 showing us what is really possible with this motherboard? Is Seti
highlighting a significant problem within the VIA chipset? There was no such
discrepancy with the BP6. I have only just noticed this and haven't been able to
deduce a logical explanation for it (apart, that is, from not being technically
minded enough :)
Conclusions
The Case - Chenbro 9891
As you would expect - loads of room. This has greater advantages than you might
initially expect. The layout, and the space, means that motherboard
accessibility is second to none. Air-flow through the case is aided by the lack
of obstacles. And the cable-run distance between each half of the case is not a
problem as I had feared.
Access via the side panels is also very easy. Dare I say even better than those
cases now sporting knurled nuts?
I find myself just sitting quietly admiring it. It's even better on the inside
so that is 10/10 from me.
The Mobo - Iwill DVD266-R
There is so much to like about this board and yet.....
It does exactly what it says on the box - but little more. I don't think I am
being unfair in giving it just 7/10. I do wish that I had used PIII700's instead
of the PIII 1GB's although this is a feature of the cpu's rather than the mobo.
I can't help thinking that the VIA chipset is lacking some finesse in this dual
setup. Maybe a future BIOS upgrade will release some of the pent up capability
within this board.